Card Kit Instructions

Whilst each kit is slightly different we hope to keep the basic card kit instructions the same so they apply to most, if not all of them. You don’t have to follow these instructions to the letter, card making is a craft and you should feel free to alter things and experiment. These cards can be very basic or quite complicated depending on what you choose to leave out or add.
When printing out it is important that you print all the sheets the same size. Because the sheets are A4 in size your printer may think it can’t print them at 100% unless you have a boarderless one. You should be able to over-ride this and print at 100% as we have left a good white space around each image. If you do have to print it at 90%/85% or something then just ensure all sheets are decreased in size by the same amount.
These are 5×7 cards, if you want ones which are A6(ish) in size you should print all the sheets at 82%). These card kit instructions should be easy to follow but please let us know of any issues.
Materials and equipment needed
- White Card
- White Paper
- White Photo Paper 230gsm+ (Optional)
- Double Sided Sticky Pads or silicone / 3D glue (for decoupage / pyramid designs)
- Double sided Sticky Tape or Paper Glue (for Inserts)
- Sharpe Craft Knife
- Scissors
- Ruler
- Cutting Board (optional)
1. Download and print out the sheets
You should do the printing onto the following material
Sheet 1. Onto A4 White Card
Sheet 2. Onto White Card or Thick Photo Paper 230gsm+
Sheet 3. Onto good quality white paper.
Each set contains 3 sheets, the basic card, the add ons (normally decoupage or pyramids) and an insert sheet. If you wish you can just print out sheet 1, fold it in half and have a really simple card (not a lot of crafting involved though!). To get a bit more adventurous print out sheet 2 and/or sheet 3.
2. Do the cutting out.

All the sheets need to be cut to some extent. Sheet one should be cut out to the rectangle card. On most of them there is a blue guideline and you should cut the sheet so this line is cut off. Best done with a ruler and craft knife on a cutting board.Sheet 3 is cut to the same size as sheet one, basically just cut out the outside of the insert sheet. Do NOT cut out the white shape in the middle of the sheet. This will be where you put your writing. Sheet 3 is the most difficult to cut out, not so bad it it is a pyramid design but can get a little complicated if it is decoupage. Cut out everything including the frame and the centre of the frame (to save space we often out something in the middle of the frame which will need to be cut out as well.
A word of warning: Some ink can can smudge or come off on your hands, which you can then transfer back onto different places on the card. Where-ever possible only touch the white parts to hold and move.
/lgc_column]
3. Fold the main card.

Fold Sheet one, the main card, in half. I normally use the blunt side of a knife and a ruler to indent it to make the folding easier.
4. Do the main decoration.
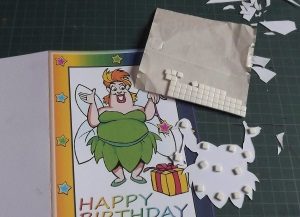
Now is the time to do the main decoration, normally either decoupage or pyramid / stacker. To do this you should use a silicone / 3D glue or double sided sticky pads to act as spacers between the layers. If using double sided sticky pads it isn’t necessary to stick them all both sides. One side will be enough for many whist 3 or four can be used double sided to stop it from moving. If the card has a second layer frame on it it is best to construct the layers in the middle first and put the second layer of the frame on afterwards. You don’t have to use all the decoration, even in this example I have only used half the available decoupage as I felt this was enough.
/lgc_column]

5. Fix the insert sheet.
Finally you need (if you choose) to fix the insert sheet in. To do this you can either use glue or double sided sticky tape. If you don’t like the one which is provided you can always use a plain white sheet instead.
We hope you found these card kit instructions easy to follow. If you have any questions please catch us in the form. Or use the contact us form.
Index of Card Kits
/lgc_column]

